After seeing a commercial on TV, Brekken came running in to me:
"Mom! There's a new show I want to watch. It's Casper the Holy Ghost!"

Monday, September 24, 2012
Monday, September 10, 2012
The Very Ugly Sofa: Before and After
For my other home decorating project, I decided to tackle our unattractive, uncomfortable sofa. I really wanted to pick up a nice slipcover while we were at IKEA, but (see mention in previous post about dragging kids through IKEA) I didn't have a chance to look. But based on previous experience looking at slipcovers for this sofa, I'm pretty sure that they would have been more than I wanted to spend.
But I REALLY needed to do something with the sofa. I don't know how to fix uncomfortable, but there must be SOMETHING I could do about the ugly. When you look at it, the back and arms are in decent shape, it's mostly the cushions that are so awful.
And then I had an idea. I didn't need to cover the whole sofa, just the cushions. I've tried before to cover them up by tucking a flat sheet around them, but it always pulls loose. But what if I made a cover for the cushions? So I went looking for fabric and ended up buying some cheap flat sheets. It was actually cheaper to buy a couple of flat sheets than if I'd just bought the fabric I needed. Plus this way, all the edges are nicely finished already. I even found some in a perfect shade of eggplant that goes nicely with the purple walls in my living room.

It was super easy. I just folded the sheets to fit snugly around my couch cushions, pinned it, and sewed a grand total of 4 seams (2 for each cushion cover). It basically made a big pillowcase-like pouch. Then I slipped the cushions inside. It took about 10 minutes altogether. That's about all the time I can squeeze out for projects around here.

It's not perfect, but it looks a lot better than before!
About 5 minutes after the kids got home (and approximately 2 minutes after I had given them the rules about no spilling anything on the new cushion covers), we had our first spill on the new cushion covers. *sigh*
Luckily it was just water, so it dried just fine. And if we're not so lucky with the next spill (because there's sure to be a next spill), I'll be glad I left the back edge open so it's easy to pull the covers off and toss them in the washing machine!
But I REALLY needed to do something with the sofa. I don't know how to fix uncomfortable, but there must be SOMETHING I could do about the ugly. When you look at it, the back and arms are in decent shape, it's mostly the cushions that are so awful.
 |
| Notice the stains left by 8 years of children's spills. |
 |
| Also the shredded upholstery and stuffing poking out of the cushions. |
 |
| It's even worse when you flip the cushions over. |
And then I had an idea. I didn't need to cover the whole sofa, just the cushions. I've tried before to cover them up by tucking a flat sheet around them, but it always pulls loose. But what if I made a cover for the cushions? So I went looking for fabric and ended up buying some cheap flat sheets. It was actually cheaper to buy a couple of flat sheets than if I'd just bought the fabric I needed. Plus this way, all the edges are nicely finished already. I even found some in a perfect shade of eggplant that goes nicely with the purple walls in my living room.

It was super easy. I just folded the sheets to fit snugly around my couch cushions, pinned it, and sewed a grand total of 4 seams (2 for each cushion cover). It basically made a big pillowcase-like pouch. Then I slipped the cushions inside. It took about 10 minutes altogether. That's about all the time I can squeeze out for projects around here.

It's not perfect, but it looks a lot better than before!
About 5 minutes after the kids got home (and approximately 2 minutes after I had given them the rules about no spilling anything on the new cushion covers), we had our first spill on the new cushion covers. *sigh*
Luckily it was just water, so it dried just fine. And if we're not so lucky with the next spill (because there's sure to be a next spill), I'll be glad I left the back edge open so it's easy to pull the covers off and toss them in the washing machine!
Homework Station: Before and After
Haley has a lot more homework this year. And of course, it will just continue to increase. Plus as the boys get older they'll have more homework to do, too. So we decided it was time to set up a dedicated homework area so they can all have a spot to work.
Searching the Internet for a good deal, the best we found was a special at IKEA for $20.00 Since I've been wanting to visit ever since they opened, we decided to make the long trip down to IKEA to get the desks. I loved the store, but didn't get much chance to look around. And let me tell you, next time I won't let Aaron talk me out of dropping the kids at the Smaland childcare center! It would have been much more enjoyable if we weren't dragging 4 children through the store.
But we got the desks and brought them home to assemble. Where I promptly dropped a table leg on one of the desks and created a large dent. D'oh!

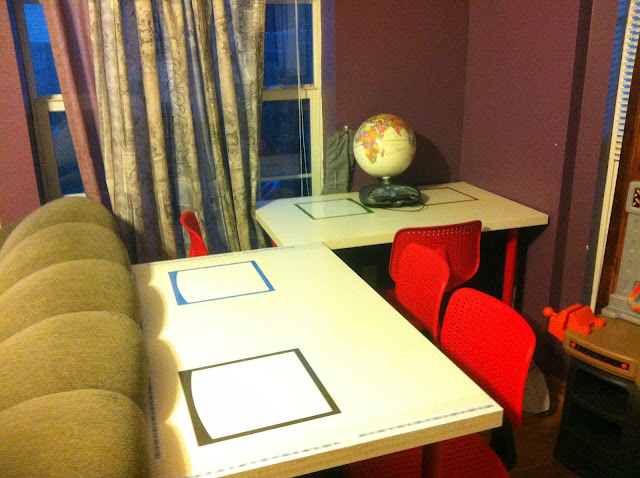
I guess for a true before and after picture, I should have posted a shot of the living room with no desks at all. But I didn't think to take that picture. So here is the homework area with desks and chairs assembled. Workable, but a little plain.

I wanted to fix it up a little more. I started by using wood putty to repair the dent in the desktop. So it was level, but still didn't look great. In trying to think of a way to improve the desktop, I stumbled across these.
 That seemed perfect! I used one of those to cover the patched dent and put another at each chair. With a dry erase marker, the kids can now use the little dry-erase boards as scratch pads while doing their homework or just to draw for fun. I also added a number line around the edges of one desk. Haley likes to use a number line when doing her match homework, but we end up drawing a new one every couple of days. Either she loses it or she writes all over it, but within a day or to we have to make another. It's not that it's difficult, but it takes up time that she should have been spending on the homework itself. So I printed out a number line from 1-100 and taped it to the desk edges, then covered it with clear contact paper. Now she'll have the number line always available, and the clear contact paper lets her write on it with her dry-erase marker and then clean it off for next time!
I'm pretty happy with the new setup. Now I'm looking forward to the kids bringing back some homework tonight so they can try it out!
Searching the Internet for a good deal, the best we found was a special at IKEA for $20.00 Since I've been wanting to visit ever since they opened, we decided to make the long trip down to IKEA to get the desks. I loved the store, but didn't get much chance to look around. And let me tell you, next time I won't let Aaron talk me out of dropping the kids at the Smaland childcare center! It would have been much more enjoyable if we weren't dragging 4 children through the store.
But we got the desks and brought them home to assemble. Where I promptly dropped a table leg on one of the desks and created a large dent. D'oh!

I guess for a true before and after picture, I should have posted a shot of the living room with no desks at all. But I didn't think to take that picture. So here is the homework area with desks and chairs assembled. Workable, but a little plain.

I wanted to fix it up a little more. I started by using wood putty to repair the dent in the desktop. So it was level, but still didn't look great. In trying to think of a way to improve the desktop, I stumbled across these.

I'm pretty happy with the new setup. Now I'm looking forward to the kids bringing back some homework tonight so they can try it out!
Sunday, September 2, 2012
Isn't That Pinteresting?
It's been a while since I managed a real post. I'm still having issues with my mental/emotional stability, and it makes it hard to get anything else done after a day of work and then an evening taking care of the family. But though I haven't been blogging much, it doesn't mean I've abandoned all my Internet addictions. I'm still hopelessly devoted to Pinterest. I've been trying a lot of the recipes lately. Most of them were pretty good... some not as successful.
 Cake Mix Snickerdoodles (http://www.mrfood.com/Cookie-Recipes/Cake-Mix-Snickerdoodles)
Haley REALLY wanted to make some cookies. More than that, she wanted to make them all by herself. The only help she was willing to accept was in dealing with the oven. So I went searching for a recipe simple enough for her to tackle on her own. I found quite a few cake mix cookie recipes and they were all pretty much the same and pretty simple. So Haley looked them over and picked out a couple of versions. She made some red velvet cookies that were actually quite good. Some devil's food cookies that were really gooey... as in, eat them with a spoon gooey. They still tasted good, though. And Sunday she made snickerdoodles. They tasted very good, but the dough was a bit too thin, resulting in VERY thin, flat cookies. So you can use this recipe for pretty much any kind of cookie just by swapping the cake mix base and any add-in, but you might want to add a tablespoon or two of flour to thicken the dough a bit. The nice thing is that a child can really do it all on their own. Haley even cracks her own eggs. It keeps her busy for a while. Makes her and her brothers happy to eat the cookies later. Gives me an incentive for good behavior (You've got to behave yourself if you want to make cookies later.). And the clean-up isn't TOO bad.
 Banana Pudding (http://pearls-handcuffs-happyhour.blogspot.com/2010/06/momma-didnt-make-it-like-this.html)
This recipe originally came from Paula Deen, so you know it's not good for you. But it sure tastes good! More trouble than a typical pudding, but worth the effort once in a while. I made it for girls' night out potluck and it seemed like a hit. I can tell you that the kids and I were pretty thrilled that there were some leftovers and ate it for breakfast the next day. (Bananas are a good breakfast food, right?)
Another girls' night out dessert. (I seem to always take a dessert. I really need to mix it up with a main dish next time.) Anyway, I liked the look of this one because it was a little healthier than a usual cobbler and it was pretty low effort. And the picture sure looks good! Unfortunately, I was not as successful as the original poster. I made one at home a few days before girls' night to test the recipe. It was pretty runny. And the topping was powdery in some spots. So when I made it for girls' night I made some adjustments. I mixed the topping together before putting it over the fruit (trying to avoid the powdery patches). I put less soda (trying to avoid the runny end result). And It was still really runny and gooey. Topped with a scoop of whipped cream it tasted ok, but it didn't look very appetizing. And it definitely didn't keep! When I took it out of the fridge the next morning it looked awful and I couldn't bring myself to serve or eat any. If anyone else has tried it with more success, let me know what you did! I still really like the idea, it just didn't turn out for me.
My first ambitious sewing project in years was a skirt for Haley. The project looked pretty simple, so I figured I could manage it. And I did. Kind of. No fault of the blogger who posted the instructions, I just wasn't as successful as she was. The skirt I made is a little too short and hangs a little bit unevenly. But with a pair of leggings it works ok. More importantly, Haley still really likes it. So I'm calling it almost successful. I may just try again now that I know what I did wrong on the first one and see if I can make a skirt that graduates from play-clothes to school/church-clothes.
 Cake Mix Snickerdoodles (http://www.mrfood.com/Cookie-Recipes/Cake-Mix-Snickerdoodles)
Haley REALLY wanted to make some cookies. More than that, she wanted to make them all by herself. The only help she was willing to accept was in dealing with the oven. So I went searching for a recipe simple enough for her to tackle on her own. I found quite a few cake mix cookie recipes and they were all pretty much the same and pretty simple. So Haley looked them over and picked out a couple of versions. She made some red velvet cookies that were actually quite good. Some devil's food cookies that were really gooey... as in, eat them with a spoon gooey. They still tasted good, though. And Sunday she made snickerdoodles. They tasted very good, but the dough was a bit too thin, resulting in VERY thin, flat cookies. So you can use this recipe for pretty much any kind of cookie just by swapping the cake mix base and any add-in, but you might want to add a tablespoon or two of flour to thicken the dough a bit. The nice thing is that a child can really do it all on their own. Haley even cracks her own eggs. It keeps her busy for a while. Makes her and her brothers happy to eat the cookies later. Gives me an incentive for good behavior (You've got to behave yourself if you want to make cookies later.). And the clean-up isn't TOO bad.
 Banana Pudding (http://pearls-handcuffs-happyhour.blogspot.com/2010/06/momma-didnt-make-it-like-this.html)
This recipe originally came from Paula Deen, so you know it's not good for you. But it sure tastes good! More trouble than a typical pudding, but worth the effort once in a while. I made it for girls' night out potluck and it seemed like a hit. I can tell you that the kids and I were pretty thrilled that there were some leftovers and ate it for breakfast the next day. (Bananas are a good breakfast food, right?)

Another girls' night out dessert. (I seem to always take a dessert. I really need to mix it up with a main dish next time.) Anyway, I liked the look of this one because it was a little healthier than a usual cobbler and it was pretty low effort. And the picture sure looks good! Unfortunately, I was not as successful as the original poster. I made one at home a few days before girls' night to test the recipe. It was pretty runny. And the topping was powdery in some spots. So when I made it for girls' night I made some adjustments. I mixed the topping together before putting it over the fruit (trying to avoid the powdery patches). I put less soda (trying to avoid the runny end result). And It was still really runny and gooey. Topped with a scoop of whipped cream it tasted ok, but it didn't look very appetizing. And it definitely didn't keep! When I took it out of the fridge the next morning it looked awful and I couldn't bring myself to serve or eat any. If anyone else has tried it with more success, let me know what you did! I still really like the idea, it just didn't turn out for me.

My first ambitious sewing project in years was a skirt for Haley. The project looked pretty simple, so I figured I could manage it. And I did. Kind of. No fault of the blogger who posted the instructions, I just wasn't as successful as she was. The skirt I made is a little too short and hangs a little bit unevenly. But with a pair of leggings it works ok. More importantly, Haley still really likes it. So I'm calling it almost successful. I may just try again now that I know what I did wrong on the first one and see if I can make a skirt that graduates from play-clothes to school/church-clothes.
Subscribe to:
Posts (Atom)